Thursday, June 29, 2006
Blocking a washcloth- that would be like putting a clean ice cube tray in the dish drain rack, right?
...Something I'm never never going to do!
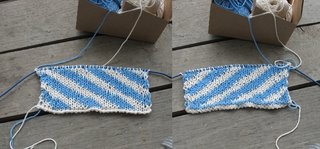
Lessons learned from doubleknitting-
1. It's really hard to control your stitch tension on two seperate pieces of knitting at the same time when it's the same piece of yarn.
2. Any mistake will probably be perfectly duplicated on the other side as well.
3. This is a situation where a border would be wonderful to cover the awkward edges.
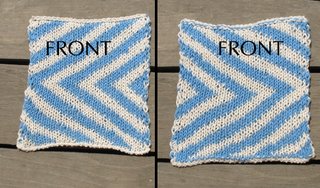
At first I was going to label the photo "front" and "back"... I realized I had embraced the soul of doubleknitting with all the heart of say, the kind of person who would operate a clothes dryer with solar energy.
Tuesday, June 27, 2006
Seeing double... knitting. The last time I ventured into double knitting was to knit a pair of preemie socks on a pair (not set) of double pointed needles. It wasn't true double knitting, it was just knit, slip, knit, slip out on one side and back on the other. Doing the tiny stitches on one needle allowed me to manage the tiny rounds without having to wrangle all that pointy stuff.
This time I am going to try for a pattern in two colors to make a material with two "right" sides. This time I'm purling a back stitch and knitting a front stitch in alternating colors. Because the yarn changes color every four (or eight depending on how you think about it) stitches- the material is very well stuck together. In a few rows I am going to make the pattern double back until I have a square washcloth with v's.
It's taking a while to get the hang of where the yarns need to be when the knits and purls are made but I think by the time I am done with this square I may be ready to tackle a design like the sunset saddleblanket colors. I'm still floundering at the edges- they are locked together but it's not always pretty. I figured out that horizontal stripes in doubleknit ar not stuck together- vertical ones are stuck together- but would be a total PITA. Diagonals are nice and stick with argyle type design integrity smarts. So if I do go for the saddlepad design- I'm going to have to plan the diamonds so they tack the layers together- I don't want the layers to be shifty like a pillowcase.
Friday, June 23, 2006
One of these skeins is not like the other! (the oddball is Alpaca/cotton... can you pick it out?) I included my hand for scale. This mohair is from a roving I had processed at Wooly Knob fiber mill. I really like their service and quality of their work... it's just too bad that my goat fleece is not a higher grade. The yarn has a nice sheen and will probably be very pretty dyed up- but it is not soft enough for sweaters or jackets.
Thursday, June 22, 2006
I have been spinning a bunch of my mohair and having a challenge to think of what it will become. It's a little too coarse for anything but a horse blanket or a carpet- so I'm thinking in that direction... only problem is I don't have a loom. So I was thinking of trying a pattern like this in double knit. I was inspired by a square of the wall hanging by Lucy Neatby
When it does come time to dye this I will want at least 6 colors- three for the background and three for the foreground- if not six colors- somehow to get a very gradual gradation along the lengths. I'm no dying expert, so this will take some concentration- but until then I have plenty of spinning left to do.
Tuesday, June 13, 2006
How to tie a mud knot for a carriage horse:
My version of a mudknot stays in for hours, tight without hurting tail circulation. You need no polo wrap or even rubberbands. I like to use a shoelace the color of the tail hair- but did it with a red ribbon here for visibility. The ribbon is too long, but I didn't want to cut it. You only need a yard. When I used to drive commercial carriages I tied my horse's tail up so that it did not go in the diaper bag and so he still had a flowing long tail for his days off.
You can French braid the tail if you want to be really fancy. Here I demonstrate just braiding from the tip of the tail. Notice how I sectioned the hair so that the two side sections will make a sweep for about the last four inches of tailbone.
When making the braid- be sure to sweep it outward toward yourself and not just straight down toward the ground.
That middle section of hair will probably be shorter and thinner than the other two sections- so you will need to eventually borrow some hair from another section so that all sections of braid finish at the same time.
When you are about 4 inches from the end of the hair- add the ribbon. When you are close to the end of the hairs- make a half hitch with one side of the ribbon around the other piece of ribbon and all the remaining hair.
Fold the braid upwards and to one side- wrap the braid around the tail bone.
Tuck the braid/ribbon through one loop of the braid base and pull it snug.
Double the braid back and wrap it around the tailbone in the other direction until there is no more tail to wrap.
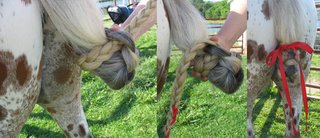
The ribbons now part ways- one goes around one way- the other goes around the other way... wrap the tail once and tie in a bow. If you want it to be invisible- tuck the bow inside.
If your horse has never had a mud you may want to tie his tail up a few times before you hitch him so he is already used to it. There will be a lot of weight at the end of his tail bone and if he hits himself with it he may not recognize it as his own tail. For most horses the mudknot keeps their tail heavy and better behaved, but for some determined tail wringers it just gives them more momentum to swing that puppy.
Friday, June 09, 2006
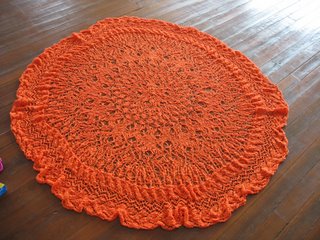
Big Block! ... and I don't mean the kind in a truck. I finished up the perfection leaf lace last night and grafted the ends this morning. I really lucked out with the way the pattern lined up on the right row- but somehow I just could not get the zig zag to graft uninterrupted. I finally decided that the problem was not in my method of grafting, but that I may have made a mistake way back at the start of the edging before I really knew the pattern, and before I could have even understood the error. I figured that I just had to "let it go" which I did with ease as that is how this whole project has been- an excercise in relaxation. In fact- I'm feeling a little bit lost now that I'm done- I don't have my bunchy orange lap dog to take with me where ever I go.
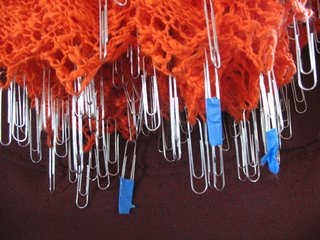
I don't know if the method I used to block this has been done- or if I made it up- but it worked for me. My son said it was like a drum. Originally I was going to tape the paperclips to the wooden floor- but the tape did not stick well enough- so I used carpet. Unblocked my Pi had a radius of 33 inches so I added 1/3 more and then ten more inches for the stretching.
First I placed a paper clip in the stitch of each point. I found out that I had 94 repeats. I had to handle the shawl carefully from that point on because the paperclips wanted to snag any material which rubbed it. I marked the clips in 1/4s with tape. In hindsight I thought that it might be a good idea to add stitch markers as I knit so that the correct stitch would be automatically marked rather than having to find it- these would also not snag and would provide a strong pull and are not very expensive to nip out later with some wire cutters.
Using a cord for a radius I divided the carpet into four quarters and placed paperclips 24, 23, 24, 23 spaced in the quarters. Luckily my handwidth made a good measure for spacing. It's not precise- but hey... theme. I just jabbed the paperclip into the looped pile of the carpet- then I laced the whole thing with some slippery kite string and adjusted a few times. My son was a great help during this process.
I'll admit that I am going to miss the texture of the unblocked pi- but it photographs better than it looks in 3d. In anxious to see how the severely blocked shawl will react after it is released from it's gridle. In the end the shawl grew over 20 inches.
Tuesday, June 06, 2006
Two wonderful days in a row! We got Lacey hitched today with just a little bit of jumping around. The third time was the charm and once we got her hitched to the cart she was fine and walked off just like a ... majorette. Getting these two ponies hitched and going again is such a relief and joy for me. I hope we can do lots of fun things with them this year.
Sunday, June 04, 2006
What a marvelous day! We hitched Freckles to the easy entry cart for the first time. He has had a lot of time off since the pregnancy and birth of Angus... he started right up without a problem- we went for a lovely drive out on the road. Today was perfect horse weather- cool and breezy with mixed clouds. Soon I will hitch Lacey... I hope it goes as well- I can only wish. Freckles is really so outstanding a little guy!
Subscribe to:
Posts (Atom)