Thursday, June 29, 2006


Blocking a washcloth- that would be like putting a clean ice cube tray in the dish drain rack, right?
...Something I'm never never going to do!

Lessons learned from doubleknitting-
1. It's really hard to control your stitch tension on two seperate pieces of knitting at the same time when it's the same piece of yarn.
2. Any mistake will probably be perfectly duplicated on the other side as well.
3. This is a situation where a border would be wonderful to cover the awkward edges.

At first I was going to label the photo "front" and "back"... I realized I had embraced the soul of doubleknitting with all the heart of say, the kind of person who would operate a clothes dryer with solar energy.

Tuesday, June 27, 2006


Seeing double... knitting. The last time I ventured into double knitting was to knit a pair of preemie socks on a pair (not set) of double pointed needles. It wasn't true double knitting, it was just knit, slip, knit, slip out on one side and back on the other. Doing the tiny stitches on one needle allowed me to manage the tiny rounds without having to wrangle all that pointy stuff.

This time I am going to try for a pattern in two colors to make a material with two "right" sides. This time I'm purling a back stitch and knitting a front stitch in alternating colors. Because the yarn changes color every four (or eight depending on how you think about it) stitches- the material is very well stuck together. In a few rows I am going to make the pattern double back until I have a square washcloth with v's.

It's taking a while to get the hang of where the yarns need to be when the knits and purls are made but I think by the time I am done with this square I may be ready to tackle a design like the sunset saddleblanket colors. I'm still floundering at the edges- they are locked together but it's not always pretty. I figured out that horizontal stripes in doubleknit ar not stuck together- vertical ones are stuck together- but would be a total PITA. Diagonals are nice and stick with argyle type design integrity smarts. So if I do go for the saddlepad design- I'm going to have to plan the diamonds so they tack the layers together- I don't want the layers to be shifty like a pillowcase.

Friday, June 23, 2006


One of these skeins is not like the other! (the oddball is Alpaca/cotton... can you pick it out?) I included my hand for scale. This mohair is from a roving I had processed at Wooly Knob fiber mill. I really like their service and quality of their work... it's just too bad that my goat fleece is not a higher grade. The yarn has a nice sheen and will probably be very pretty dyed up- but it is not soft enough for sweaters or jackets.

Thursday, June 22, 2006


I have been spinning a bunch of my mohair and having a challenge to think of what it will become. It's a little too coarse for anything but a horse blanket or a carpet- so I'm thinking in that direction... only problem is I don't have a loom. So I was thinking of trying a pattern like this in double knit. I was inspired by a square of the wall hanging by Lucy Neatby

When it does come time to dye this I will want at least 6 colors- three for the background and three for the foreground- if not six colors- somehow to get a very gradual gradation along the lengths. I'm no dying expert, so this will take some concentration- but until then I have plenty of spinning left to do.

Tuesday, June 13, 2006

How to tie a mud knot for a carriage horse:

My version of a mudknot stays in for hours, tight without hurting tail circulation. You need no polo wrap or even rubberbands. I like to use a shoelace the color of the tail hair- but did it with a red ribbon here for visibility. The ribbon is too long, but I didn't want to cut it. You only need a yard. When I used to drive commercial carriages I tied my horse's tail up so that it did not go in the diaper bag and so he still had a flowing long tail for his days off.

You can French braid the tail if you want to be really fancy. Here I demonstrate just braiding from the tip of the tail. Notice how I sectioned the hair so that the two side sections will make a sweep for about the last four inches of tailbone.

When making the braid- be sure to sweep it outward toward yourself and not just straight down toward the ground.


That middle section of hair will probably be shorter and thinner than the other two sections- so you will need to eventually borrow some hair from another section so that all sections of braid finish at the same time.

When you are about 4 inches from the end of the hair- add the ribbon. When you are close to the end of the hairs- make a half hitch with one side of the ribbon around the other piece of ribbon and all the remaining hair.


Fold the braid upwards and to one side- wrap the braid around the tail bone.

Tuck the braid/ribbon through one loop of the braid base and pull it snug.

Double the braid back and wrap it around the tailbone in the other direction until there is no more tail to wrap.


The ribbons now part ways- one goes around one way- the other goes around the other way... wrap the tail once and tie in a bow. If you want it to be invisible- tuck the bow inside.


If your horse has never had a mud you may want to tie his tail up a few times before you hitch him so he is already used to it. There will be a lot of weight at the end of his tail bone and if he hits himself with it he may not recognize it as his own tail. For most horses the mudknot keeps their tail heavy and better behaved, but for some determined tail wringers it just gives them more momentum to swing that puppy.

Friday, June 09, 2006


Big Block! ... and I don't mean the kind in a truck. I finished up the perfection leaf lace last night and grafted the ends this morning. I really lucked out with the way the pattern lined up on the right row- but somehow I just could not get the zig zag to graft uninterrupted. I finally decided that the problem was not in my method of grafting, but that I may have made a mistake way back at the start of the edging before I really knew the pattern, and before I could have even understood the error. I figured that I just had to "let it go" which I did with ease as that is how this whole project has been- an excercise in relaxation. In fact- I'm feeling a little bit lost now that I'm done- I don't have my bunchy orange lap dog to take with me where ever I go.


I don't know if the method I used to block this has been done- or if I made it up- but it worked for me. My son said it was like a drum. Originally I was going to tape the paperclips to the wooden floor- but the tape did not stick well enough- so I used carpet. Unblocked my Pi had a radius of 33 inches so I added 1/3 more and then ten more inches for the stretching.


First I placed a paper clip in the stitch of each point. I found out that I had 94 repeats. I had to handle the shawl carefully from that point on because the paperclips wanted to snag any material which rubbed it. I marked the clips in 1/4s with tape. In hindsight I thought that it might be a good idea to add stitch markers as I knit so that the correct stitch would be automatically marked rather than having to find it- these would also not snag and would provide a strong pull and are not very expensive to nip out later with some wire cutters.


Using a cord for a radius I divided the carpet into four quarters and placed paperclips 24, 23, 24, 23 spaced in the quarters. Luckily my handwidth made a good measure for spacing. It's not precise- but hey... theme. I just jabbed the paperclip into the looped pile of the carpet- then I laced the whole thing with some slippery kite string and adjusted a few times. My son was a great help during this process.


I'll admit that I am going to miss the texture of the unblocked pi- but it photographs better than it looks in 3d. In anxious to see how the severely blocked shawl will react after it is released from it's gridle. In the end the shawl grew over 20 inches.

Tuesday, June 06, 2006


Two wonderful days in a row! We got Lacey hitched today with just a little bit of jumping around. The third time was the charm and once we got her hitched to the cart she was fine and walked off just like a ... majorette. Getting these two ponies hitched and going again is such a relief and joy for me. I hope we can do lots of fun things with them this year.

Sunday, June 04, 2006


What a marvelous day! We hitched Freckles to the easy entry cart for the first time. He has had a lot of time off since the pregnancy and birth of Angus... he started right up without a problem- we went for a lovely drive out on the road. Today was perfect horse weather- cool and breezy with mixed clouds. Soon I will hitch Lacey... I hope it goes as well- I can only wish. Freckles is really so outstanding a little guy!

Friday, May 26, 2006


The new color chart is working out very well for me and my knitting speed for the border is back to normal. Here is a close up of the edging spread out- it should tighten up a bit more with blocking- but it's really neat to see how different the orange slub cotton manages this pattern from the white yarn in the knitting-and website sample.

Last night my DH asked me if "this thing was ever going to end" and if I was knitting "a circus tent" I think he is getting sick of me hauling around this orange pile with me where ever we go.

How I redid the chart in photoshop:

I opened the original black and white grid chart in photoshop and then made the canvas larger so I could stretch the chart vertically.
Then I opened up a new layer and laid some colored bars across the various pattern rows- by turning down the transparency of the entire layer it allowed me to see the original grid through the colors and for me to have pastel shades in the final image.
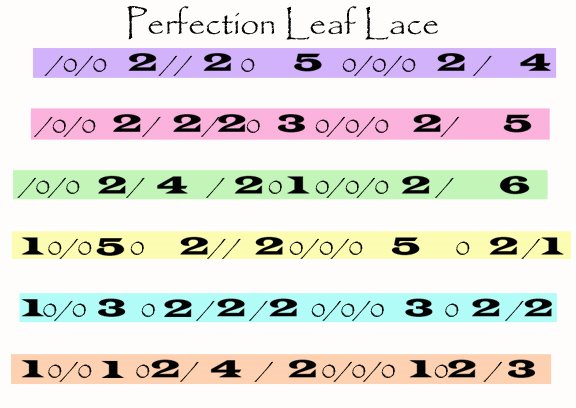
Then with the text tool in a new layer and a bold font- I wrote over all the spots where there were plain knit stitches. turning into a 6 sure makes things easier on my eyes.
Then I used a new layer of text, and a different font to mark all the k2tog and yo spots.
Finally I turned off the original grid and put in a white background. The End! Happy Chart.

Thursday, May 25, 2006


I have been working on the lace edging and I have been struggling to read the pattern. I have both versions (word and graph) of the vintage 1891 pattern printed out from the fantastic website resource of Sarah Bradbury....
http://www.knitting-and.com/homework/perfection-leaf-lace.htm

Anyway- I have to knit five hundred some odd rows of this 12 row repeat- and I'm just not getting the groove of it. I love how the lace looks- but I hate knitting it word by word and I keep hoping that I will memorize it- but my brain is just not grabbing on to these slippery jagged notations.

I wound up copy/pasting the text pattern and adding larger spaces between the pattern rows. Then I circled the rows with different colors of crayon, so I could visually return to "the red row" I think part of the problem is that the key first stitches of every other row of the pattern gradually go from 6 down to 1- but the numbering of the rows is such that the row number and the key number are not matched or relevant. Would it be easier to tell the knitter- "In this pattern you should count the rows of your pattern in reverse- starting with row twelve the row begins with six stitches... 12... 6... numbers make sense! As it is we have row 11 with starts with 4, row 9 with five and seven with 6.

Well- I misplaced my cheat sheet and had to print it out again and decided that rather than fight this dragon- I'm going to take it to the spa for a makeover. I redid the whole thing using photoshop and suddenly it become very readable (for me) I am very interested in the ways that people learn and the various types of "thinkers" and I'm curious to hear if other knitters like the chart that I made for this pattern- does it help you too?

It's read from bottom to top right to left, just like a chart. Between every pattern row- there is a plain knit (or purl as the case may be) row. The right edge of the chart is the straight edge of this edging. The large number represents a number of stitches to knit, / is a k2tog, and O is a yarn over. The pattern starts with a base of 28 cast on stitches.

Monday, May 22, 2006


Has it been this long? The last time I took a picture of the orange Pi Shawl it was the size of a dinner plate- now it's big enough to blanket a pony. So, let's be clear- Banjo is a large pony- he is not the size of a racehorse. I was trying to find a good surface to spread out this unblocked work for an in-progress photo and discovered that the round darkness of the pony and the slight prickle to his hide does a great job at holding the shawl spread out... I am NOT knitting a fly sheet! (Don't even joke about that!)

The border of this shawl, ("perfection leaf lace" from knitting-and.com) is knit around the edge so that there is no casting off. The pattern of the border is about 30 stitches wide- so it will add a lot of width and gobble up a lot of yarn. I have plenty of yarn left- so that's fine... it is just some real slow going to get all the way around the shawl. I just started on the border yesterday- so that's about a days worth of knitting there. It' looks like this project may take me through the summer. I did block a sample of the border and I love how this slubby yarn blocks- after wetting it really melts into place and the designs become much more distinct. I'm still trying to figure out a strategy for the big block... and will have lots of time to dwell on that.

In mulling over the mathematics of thePI shawl- I'm now understanding that I really didn't need to do a doubling row- or rather- since I didn't need to make this round 98 rows deep- I didn't need the fullness that would require doubling. I am only needing about half of that radial distance- so I probably could have gotten by with a 50% increase rather than a 100%. What does that mean? It means that my giant border is going to be a lot longer than it needs to be- but that also means that it will block wider and with less tension- and in the end- I think that will be fine.

Monday, April 17, 2006


I'm going to send some photos to the Maryland Sheep and Wool Festival, hopefully the fact that they are photos of goats is not going to be an issue. I decided that since I'm going through the effort of making up a package, that I would like to see both my kids enter in the Junior Division- so these are the shots!!

When I unloaded the camera into the computer and was scanning the previews... I FLIPPED- I asked my son, he's 8... "did you realize what you were doing when you took this picture? Do you know what composition is?" he said, "Well I know what it is when you are writing, but I don't know what it means with photography." So I proceeded to show him all the ways this photo has awesome tight composition... he looked at me and shrugged... "well I was just trying to get all the goats in the picture!" oh man... the photo of the year is taken by Mr. Humility.


My daughter loves this enhanced picture of April and Stormy.

Sunday, April 16, 2006


What an amazing sky we had on Friday! As the sun was going down huge billows of mammatus clouds dripped down like a blanket of lava lamp in the unstable atmosphere.


This is my start to the Mystery Pi Shawl. I am using a flake cotton which is mostly thin like a crochet thread- but has big slubs which add a lot of texture and Art Deco interest. I think this shawl will be wonderful over pink or black. The color is a bright tangerine. I chose the "D" option for the first pattern band from the EZasPi knit along.

Sunday, April 09, 2006

"I have waited my whole life for you!"

The second twin emerges
Earlier, Nana labored with the company of May's twins.

A morning check found Nana with a steeply pitched pelvis, a sure sign of a birth coming soon. An hour later she was nested in to the goat house meditating her way through some big contractions. May's babys stayed close by with Nana and May went out to the field to graze. Nana was very expressive during her labor, staring at her belly, nudging it with her nose, flexing her ears and stretching her mouth. I really felt for the old girl but gave her some space for the early part of labor. When she really seemed to get to the pushing stage I went in with her and she seemed to really appreciate being petted and soothed.

She seemed to be pushing and straining a lot without much progress. When I finally saw the tips of the hooves emerging I was pretty sure they were upside down, so I went in the house to call talk my mother in law about what we should do. Lois is a pro at birthing the mammals from years on a dairy farm and she talked me through every possible position until I was totally terrified. When I got back to Nana there was a nose and a dark purple tounge sticking out too- and everything was facing the right way. Nana seemed to be having a very hard time pushing the baby out. I helped pull the baby's feet just a little and as soon as the shoulders delivered the rest slid out fast. Nana went to work cleaning him up and the next kid, a girl, came "right out on his heels" now I know where that phrase comes from. As I was suctioning the goo out of the second twin's mouth- the first was already climbing to his feet and poking around for a teat.

Just about then our neighbors were pulling out of their driveway and noticed our family commotion- and we invited them to come over and see the miracle too. I'm guessing about six people came over to "ooh" and "awe" over the little babies who were so strong!

Nana hugged her babies with her neck as she cleaned them off. To look at the pictures you could almost cry for her that she has no arms to hold her newborns. The expression of love and contentment on her face is so clear it's as if she is saying, "I have waited my whole life for you!"


The little skirt came off the needles last night. I was happy to see the end result of the ribbed ruffle which was not fully realized until off the restriction of the needle. This skirt pattern is pretty straightforward with the only elusive design element being a series of increasing short rows at the back base of the waistband which gives a good rise to back. The waistband is 2x2 ribbing with YO eyelits for a drawstring.

The lower edge ribbing begins with a M1 every 2 stitches- after a round this turns to k2 p1. After 3 rounds of that another row of increase in the purl section which then becomes K2 P2 for 3 more rows. Then an increase round with a M1 between the two K sts and that becomes K3 P2 for 3 rounds. Then increase in the middle of the P sections for a K3 P3 pattern.

The end result is a very springy ribbing with flair- it gives all the flounce of a ruffle and leaves the clownish loopy element behind.

My daughter put this outfit together herself and I am amazed at how her decision to wear her hat brim down seems to go perfectly with a 1920's style flapper skirt! I'm thinking that this skirt would be fantastic done in two colors- the second color as a stripe just above the pleats would really accentuate the hobble skirt look.

Friday, April 07, 2006


Yesterday April's leg supports came off in stages, the lower legs in the AM and the upper legs in the afternoon. She is now walking... running and hopping... able to initiate and maintain nursing all on her own! She has made so much progress in a day! Here is a picture of April and Stormy- she's the one trying to dash out of the frame! Don't worry- Speck, the cattle dog is on the other side of the fence.

Wednesday, April 05, 2006


Orthodics for a baby goat
It's been a tough day and a half but I think little April is almost out of the woods. She still has a long way to go in terms of walking on her own- but this afternoon she was out moving in the grass with her mom and brother Stormy. She's not bucking and kicking... but she can shuffle around.

Yesterday afternoon I took her down to the Vet for a vitamin powerboost injection and to get an honest opinion from the vet if she might make it or if she had a crippling birth defect. He called her "spraddle legged" and thought she would be fine with a little extra help- so we are going to give it our best shot. He suggested that some people tie the legs together to help them get balance and control.

When we got home I threw together a stanchion with some old fenceposts so I would be able to help the baby get to the teat without getting boxed in the ear and without May circling and stomping on us all. So now this LC is working with a teat target that only moves about 4 inches forward and back. April still seems to have a good suck reflex and a strong will to live.

The first try at tying Aprils leg's together went pretty well- I padded her legs with paper towel and then wrapped the cuff with duct tape and then tied a length of yarn around. The padding and tape should prevent the yarn from cutting into her skin and the cuffs can turn a bit as she shuffles. It looked great at first and it gave her lots of stability to stand- but when she fell down her knees flipped outward till they faced backwards (as if she had no shoulderblades at all!) This is illustrated in one of the pictures. I realized that she would need a second string to keep her knees together. Now with the double support she can stand, lay down and shuffle around. She can kneel down to nurse without sinking down to her sternum.

I was up several times during the night to make sure April keeps her strength up and then I came in to my own little nursling who was fussing as we are all coming down with a cold. Today I was exhausted and along with the physical misery of this cold I was starting to have feelings of despair creeping in because we had one bad nursing session with April who seemed to have lost her will or ability to suck. Finally this afternoon April had another good nurse at the stanchion and then afterwards I got to see her really moving around on her own and I realize that it's possible that the bad session may have simply been lack of hunger! Maybe she had already nursed on her own! Let's hope!

Tuesday, April 04, 2006


The linen stitch is my favorite knit stitch. Here is an unfinished bag I made with peaches and cream varigated cotton. I love what the linen stitch does to varigated yarn how the stripey effect is really broken up and the honeycomb pattern that emerges. I have trouble though deciding which side I like the best. I'd like to finish this bag with a lining- but I hate to cover up the "wrong" side of the work. Just to avoid any confusion- the solid pink side panels were knitted perpendicular to the linen stitch panel.

May's twins were born yesterday afternoon! They are a boy and a girl. So far the little girl is having a tough time getting going. She isn't able to stand up yet and falls spraddle legged, but she is alert and otherwise very thrifty. It's a little tough to crawl into the truck cap to help out- but once inside it is very cosy in the thick hay bed. There was frost on the ground this morning. I tried helping her up, by flexing her legs and holding her knees together, she was able to raise up enough to find the teat and nurse a little this AM. She passed a meconium poo shortly after, so I think she got enough milk to make a difference. May did give me a good box in the ear though for trying to mess with her babies- she is a protective good mom... all the "mmm" "MMMM" "mmmm" "MMMM" back and forth communication between the babies and mom is just as sweet as sunshine.

Sunday, March 26, 2006


Knit Blanket for a toy pony by Sarah Thompson

Gauge 6 or 7 sts to the inch- 6 for a slightly larger looser blanket
size 1 needles or whatever gives you gauge. 2 Double pointed sock needles will hold this project but extra care should be used when doing the stranded work that no bunching occurs.

Cast on 53 sts of main color
Rows 1, 2 and 3 -seed stitch border at hem - on each row knit 1, purl 1, k1, p1 etc…
Row 4 purl entire row
Row 5 knit entire row

Heart pattern happens in rows 6-11 if you do not wish to do the 2 color knitting continue stockinette for 6 rows in your main color, or add a stripe or two for variety.

Heart pattern has an 8 stitch repeat, there will be 6 hearts in this design. It’s important when doing stranded knitting that is not in the round that the last stitch of the pattern (complimentary color) CC is interlocked with the (main color)MC yarn- do this by twisting yarns when you change color at the last motif.
Row 6 Purl all sts- MC6, (CC1, MC7) repeat 5 more times, MC6
Row 7 Knit all sts- MC5, twist (CC3, MC5) repeat 5 more time, MC5
Row 8 Purl all sts- MC4, twist ( CC5, MC3) repeat 5 more times, MC4
Row 9 Knit all sts- MC 3, twist ( CC7, MC1) repeat 5 more times, MC3
Row 10 purl version of row 9
Row 11 Knit all sts MC4, ( CC2, MC1, CC2, MC3) repeat 5 more times

XOOXOOXX
OOOOOOOX
OOOOOOOX
XOOOOOXX
XXOOOXXX
XXXOXXXX

Row 12 purl the entire row

Begin the shaping for the rump and neck, the decreases are paired with one slanting left and the other right. The neck shaping makes a slanting border of 3 sts, the rump shaping tapers toward the tail hole.

Row 13
Bind off one stitch by knitting 2sts and passing the first stitch over the second.
(Note: This bound off loop is the future location of one front tie.)
K1, (slip 1, K1, psso). This is the decrease you will always use on the right edge of the neck opening.
K13, now decrease for rump- slip 1, K1, psso, K13 across middle, decrease left side of rump K2tog, K13, K2tog, K to end.

Throughout the piece your decreases should make this pattern- from now on I will specify where, but not how to make the decreases ../…………./………….\.............\..

Row 14
Bind off one stitch by purling 2 sts and passing the first stitch over the second. Purl the rest of the row.

Row 15
K2, decrease, K12, decrease, K11, decrease, K12, decrease, K2

Now we begin to shape the neck on every row. Be careful when purling the decreases that the correct stitch lays on the top so on the right side the pattern is maintained.

Row 16 P2, decrease, P35, decrease, P2
Row 17 K2, decrease, K10, decrease, K9, decrease, K10, decrease, K2
Row 18 P2, decrease, P9, decrease, P7, decrease, P9, decrease, P2

In the next row, along with the regular decreases, three stitches will be bound off in the center to form the tail hole.
Row 19 K2, decrease, K8, decrease, K3, pass next to last stitch over, (K1, pass next to last stitch over) 2 times, decrease, K8, decrease, K2

In this row we will make 2 stitches to bridge across tail hole. Up to this point our piece has had an odd number of stitches, it will now have an even number of stitches.
Row 20 P2, decrease, P7, decrease, make 2 stitches by half hitch cast on method, decrease, P7, decrease, P2
Row 21 K2, decrease, K16, decrease, K2
Row 22 P2, decrease, P5, decrease, decrease, P5, decrease, P2

Finish:
Slip 9 stitches to other needle and graft spine seam.

Add ties. Thread finishing needle with one strand of each color. Pass needle through bars of one bound off stitch. Doubled, you now have 4 strands to braid for tie. If you arrange the strands MC, CC, CC, MC … the 4 piece braid will make a spiral stripe, very pretty. Do the same braid on the other side of the neck opening.

Instructions for braid-
Leftmost strand- pass over two middle strands and then double back under the “right middle” strand.
Rightmost strand- pass over two middle strands and then double back under the “left middle” strand.